Track Creation

The MotoLogger application allows you to create custom tracks anywhere in the world. To create a new track, open the tracks page from the MotoLogger Dashboard screen. Once the tracks page is open, tap on the add button at the bottom right of the screen and follow the displayed prompt. After entering a track name, MotoLogger will display a track creation screen where you can begin to define your track on a map. There are two important aspects to tracks in MotoLogger: finish lines and timing gates. Each track created in MotoLogger must have a single finish line. Timing gates are used to define specific sectors on the track that you would like to time when recording a session. Each track in MotoLogger can contain as many timing gates as you would like to add. To place a finish line, tap on the add icon at the bottom right of the track creation screen. A sub-menu will be shown containing two buttons. The button containing the flag icon is used to add a finish line, and the button containing the stopwatch icon is used to add timing gates. The method of drawing finish lines and timing gates are identical, simply tap on one of the respective sub-menu buttons and use your finger to draw a line on the screen to represent your finish line / timing gate. To delete a finish line or timing gate, simply tap on the finish line / timing gate and select delete on the resulting pop-up dialog box.
Track Editing
You may edit an existing track in MotoLogger by placing a new finish line or removing / adding new timing gates. To accomplish this, open the tracks page from the MotoLogger dashboard screen. Once the tracks page is open, tap on the track you wish edit to open the track editing screen. From the track editing screen, you may delete existing finish lines / timing gates and replace them with new ones. After you have finished editing the track, tap the save icon at the top right of the track editing screen to save your changes. Note: if you attempt to save an edited track without a finish line, your track will not be saved.
Recording an Internal Session
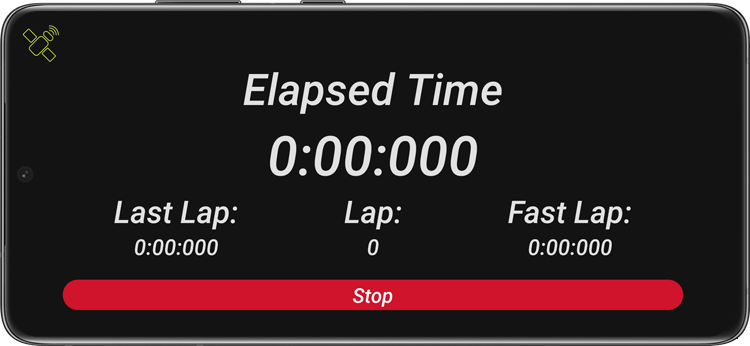
MotoLogger can utilize your mobile device’s internal GPS to record sessions. To begin recording a session with your device’s internal GPS, open the race page from the MotoLogger dashboard screen. Next, select the track you wish to record a session on and enter a name for the session. After you have completed the preliminary setup for the session, MotoLogger will display the lap timer screen. On this screen, you will find an elapsed time display, last lap time counter, lap counter, fastest lap time, and a satellite icon. You may notice that the satellite icon blinks when you first begin recording an internal GPS session. This indicates that your mobile device is attempting to acquire satellite signal. Once the satellite icon stops blinking, your device has acquired satellite connection and you may begin your session. Upon crossing the finish line for the first time, your session will begin, and the elapsed timer will start. Note: for more accurate lap times and visual lap lines, ensure you place your mobile device in a position that has a clear unobstructed view of the sky. Note: this feature is battery intensive and will drain your battery charge at a faster than normal rate.
Recording an External Session
MotoLogger can utilize the Dual XGPS160 device to record sessions. To begin recording a session with your XGPS160, power on your device and wait for the green light to stop blinking indicating that the device has acquired GPS signal. Once GPS signal is acquired, double tap the power button to begin recording your session. After you are finished recording your session, you can stop recording on the device by double tapping the power button. To import your recorded session to the MotoLogger application for analyzation, open the Sessions page from the Dashboard menu. Before proceeding with the next steps, ensure your XGPS160 is powered on and actively searching for a Bluetooth signal (this is indicated by a blinking blue light). Next, tap on the add icon in the bottom right of the Sessions page. Follow along with the prompts of the MotoLogger application to upload your recorded session to the app.
MotoLogger Analyzation Algorithm
It is important to understand how MotoLogger analyzes your lap times to ensure you can successfully record your sessions. When analyzing your data, MotoLogger will search for the first lap you completed while crossing every timing gate and the finish line defined on the selected track. Once this lap is found, MotoLogger will use the ordering in which you crossed the timing gates on this lap to analyze the rest of your laps. Now, if you cross the finish line but skip one or more timing gates on the track, then that lap will not count until you have crossed the missed timing gate(s) and any timing gates following the missed timing gates in the correct ordering determined by lap time analyzation algorithm.
Creating Bikes and Setups
MotoLogger can track various aspects of your bike, from bike maintenance to setups. To create a new bike, open the Garage page by tapping the garage button on the Dashboard menu. Once open, tap on the add icon at the bottom right of the screen and fill out the required items for your bike. To create a new setup for a bike, select a bike from the garage page. Then swipe left to the setups page. You can add a new setup by tapping on the add icon at the bottom right of the screen.
Tracking Bike Data
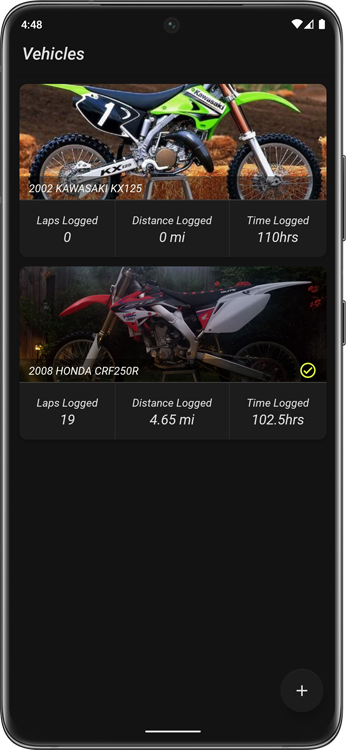
MotoLogger allows you to track the number of laps completed, distance traveled, and time logged on a specified bike. If you wish to track this information each time a session is recorded for a specific bike, you must set the bike as your default bike. To set a bike as your default bike, open the garage page from the MotoLogger dashboard menu. Once open, long tap on the bike you wish to set as default until MotoLogger displays a pop dialog showing the bike options. Then, select the “Set as default” option. You will then see a green check mark on the bike list item that you set as default.
Tracking Setup Data
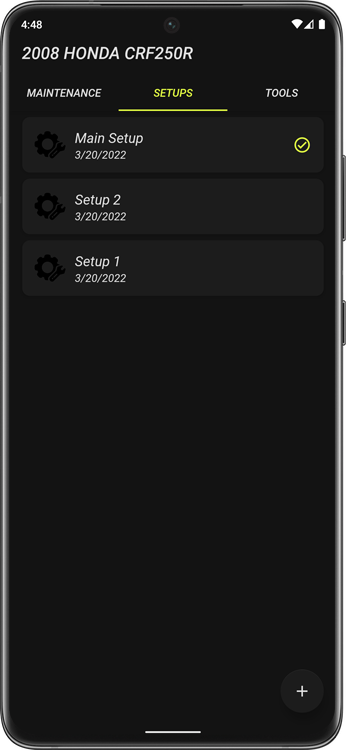
MotoLogger allows you to track and view sessions recorded under a specific setup. To track sessions under a specific setup you must first set the bike corresponding to the setup you wish to track sessions under as your default bike. Next, open your default bike and swipe left until you see your list of setups. Then, long tap on the setup you wish to set as default to open the setup options dialog box. Once the dialog box is opened, select the “Set as default” option. Once you have set a setup as default, you will see a green checkmark on the setup list item. To view sessions recorded under a setup, simply click on the setup and swipe left to view a list of recorded sessions.